Just an FYI - maybe save some of you some time...I priced out the components for Exercise 34 on both Sparkfun.com and phanderson.com - summaries below. The advancedmicrocircuits.com website didn't seem to have the 3.5mm stereo socket (Figure 5-126) and their search feature just plain stinks... took me a few minutes to find the USB cable but had to search for 'picaxe usb' to locate it...Total costs, with shipping are:Sparkfun.com...
Read more ...

Well, I finally managed to grab some time to get back to the circuit on page 277... I bought a smaller breadboard that will allow me to mount to the robot (if I can ever get this thing working) and not have to solder every component... saving me some aggravation if debugging is required.As you can see from the video, I've made a giant step...
Read more ...

Per Retrophile's suggested tip involving my relay being wired incorrectly, I changed the wiring and figured out my mistake (thanks Retrophile) - I assumed incorrectly that the relay's pins fit logically to the pin layout in the schematic... they don't. Going to the documentation for this particular relay verifies that Retrophile's pin layout...
Read more ...

I will say that, up to now, I have much preferred to use AllElectronics.com versus Mouser.com - mainly because I've found Mouser to be information overload.This morning I received an email from Mouser.com about a new web browser add-on for both IE and Firefox called the Mouser Search Accelerator... it'll basically allow you to highlight a...
Read more ...

Suggestions are coming in on ways to test or fix the problems I'm encountering. Let me explain what's happening now.I've inserted the diode that j suggested... works! The buzzing has disappeared (see video below). So we're getting close. Right now, pushing either switch (that will serve the robot as a trigger to stop and back away from...
Read more ...

A short update today - only a small bit of progress... let me explain.First off, I've gotten over sharing my dumb mistakes with the world via this blog... when you decide to walk through a book and perform all the tasks/exercises/experiments and share your results, you've gotta expect to have the occasional embarassing moment. I've had plenty during my tour of Make: Electronics, and I'm not done yet...So, here's what happened...
Read more ...

I just went over to the Components Pack 1 webpage to confirm the list of components in the kit... and I was surprised to find a large number of negative reviews... after reading over them, it appears that the kit has been out of stock for just over a month (earliest 1 star review was August 21... latest Oct 1).I'm not sure what's happening, but if you're trying to gather up the parts on your own, I've tried to include my Shopping...
Read more ...

Before cutting out the wood for the shell of the robot, I figured it might be wise to actually wire up the schematic first and see if I can get all the electronics to work. As you can see from the video and picture, I've managed to wire up the motor - I've got a temporary push button that allows me to provide power to the circuit. I'll...
Read more ...

My motor, wheel mount, and other bits arrived today. As with most electronics ordered, there's no paperwork on any of it. I can figure out most of it, but the motor has two unlabeled soldering points... my guess is that it DOES matter which wire goes where as the motor needs to spin in one direction specifically... so... I'll need to revisit...
Read more ...

My box of parts has shipped from Solarbotics, so it's just a waiting game now for the motor and other bits. I was ready to cut the 1/4" plywood but decided to wait until I get the motor and determine that it can actually be mounted properly, including the hole I'll have to drill for it to drive a wheel.In the meantime, I took a look ahead to the next robot that will require two photoresistors and two servos. I didn't find what...
Read more ...

So, it was a very nice afternoon today (a bit hot, though) in Atlanta - sunny sky, no clouds, no rain. I had a 3 year old helper who was very curious about all the wire and odd bits sitting on the deck table. After running some unshielded copper wire almost 80 feet and tying it off with the recommended polyrope to a tree, I wired up the...
Read more ...

I'm hoping for some good weather tomorrow (weather.com says YES) so I can head outside and put the finishing touches on Exercise 31... try out my little radio and see if I can pick up any of the AM band radio stations around Atlanta. I hope so... would be a nice surprise.In preparation for the upcoming Experiment 32 - you know the one if...
Read more ...

O'Reilly has a great deal right now on some eBooks - for $9.99 you can get any of their Top 10 books and guess which book is on that list?That's right - Make: Electronics is available in digital format for only $10 (no shipping costs!) - if you've been considering purchasing a digital copy or know someone who's shown an interest in the book, this is a good price.I have the digital version on my iPad... I wish I could say that...
Read more ...

Sorry, all, for the big delays in posting. My wife delivered a 10lb, 7oz baby boy on June 14th... and the weeks before were a bit crazy as well as the last week and a half. Baby and momma are fine, life is somewhat returning to normal, and I'm ready to get back to the blog and finish my coverage of the experiments in the book. I'll try to have a conclusion/summary of Experiment 31 before Saturday... and I've been collecting my...
Read more ...

So we're going to build an AM radio with an empty bottle, lots of wire, a germanium diode, and a cheap earphone... sounds fun.A few things - I didn't have a 3" diameter bottle, but a 2.5" Flinstone's Vitamins bottle, generously donated by my 3 year old son who allowed me to put the remaining vitamins in ziploc bag. Thanks, D!After removing...
Read more ...

To quote Chris Knight - "It's yet another in a long series of diversions in an attempt to avoid responsibility."Rather than pull my hair out (because I kinda like having it) I'm taking a very short break from the book to try my hand at an electronics project that is easy to follow and understand from what I've learned from Make: Electronics......
Read more ...

Well, I don't know... I've tried quite a few things. First, I replaced the wire to the speaker with a high gauge wire (thinner and twisted, not solid core) because I was worried maybe not enough power was being generated. No luck. I also replaced the TEA chip and a few capacitors (didn't have enough of each size to replace them all) but that doesn't seem to have helped either.Next, I took a look at the adapter. I thought -...
Read more ...

Okay, I'm still having trouble with experiment 29. I'm including some close-up photos here, hoping that someone may catch an error or see something that I'm not doing properly.A few things - the schematic on page 251 (Figure 5-41) shows the hookup wire and the 10 microfarad components wired up in series but with a set of pushbuttons used...
Read more ...

I got everything hooked up and I double-checked the schematic for all the resistors, capacitors, and pins on the chip. I chose to use my iPod with the $5.99 adapter I purchased from Radio Shack.I also got the speaker built - it's ugly as it can be but it's bolted to the plastic box and yes... those are Mickey Mouse diapers in the bottom....
Read more ...

Apologies for delays in posting recently - throw in a small bit of procrastination with my mistakes in ordering incorrect components and ... you get the picture.I got most of the schematic on page 251 wired up - it's a variety of colors, isn't it? I do believe there are a couple of mistakes here, but I'm not going to post them to the errata...
Read more ...

Experiment 30 builds on Experiment 29 - unfortunately, I've had some bad luck getting the proper components for these 2 exercises. Exp 29 calls for 100 microfarad capacitors of the nonpolarized electrolytic type... ditto for 47 microfarad. I thought I'd ordered the proper BP type capacitors... apparently not. One thing I did notice about Experiment 29 was that it calls for two 47 microfarad capacitors but they're not seen in...
Read more ...

Got a few more items in for Chapter 5 from various sources.First, I purchased 10 germanium diodes and a single piezoelectric earphone from SciToys as the author recommended. Since I was paying for shipping, I ordered 10 diodes instead of just 1... I may never use them but they're not that expensive and I know a few people (including my dad)...
Read more ...

I'd never seen this application of a coil, but the theory you'll read about for Experiment 28 makes sense.In the first part of the exercise, I simply wired up the circuit on page 247 and pressed the button. As expected, a single LED lit up on the button press and the other LED lit up on release of the button. It happens quickly. The author...
Read more ...

Thanks go to Seth over at O'Reilly Media, Inc for emailing me an updated version of the book - as you can see, the cover looks great on my iBook she...
Read more ...

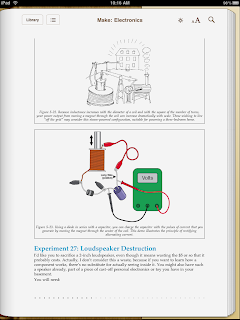
Exercise 27 calls for you to destroy a small 2" speaker... the way these speakers are designed, I don't think you'll be repairing it after you've made the required cuts to tear it apart and see how it works. I've taken video of the process if you'd rather not destroy your own speaker.The coil of wire wrapped around the small cardboard tube...
Read more ...

This was another fun little exercise that I've seen in various forms over the years... the picture on page 241 (Figure 5-22) really does hammer the concept home - given the right components, you could create something to generate a sufficient amount of voltage to power a lightbulb or other low power device. Of course, I'm not sure where...
Read more ...

My printed copy of the book is getting... worn. While sharing it last week with folks at WorldFest, it got handled by kids, adults, and adults who acted like kids. Most of the damage to the book is mine, especially the writing and highlighting in the chapters, but the book is definitely showing wear and tear...I've been wanting to get a...
Read more ...

As the author says, this is an experiment I've seen done numerous times in the past... but never done myself. I remember my high school physics instructor doing something like this but with much more wire... still, 6' of wire did have an effect.Also, the author points out that stranded wire doesn't give you the same results as solid core......
Read more ...